
Static site hosting on AWS
Although the main business for our developers at tasko Products is to build tools around our e-commerce platform and shops, we sometimes have to create simple websites too. We for example have some dedicated brand pages, documentation websites, or this blog 😉
We build our whole hosting infrastructure on the AWS Cloud and also host our static websites there. The number of services you need to set up and connect may seem a bit confusing at first but it is pretty simple. If you utilize an IaC tool like Terraform you can build the infrastructure once and reuse the code as many times as you need it.
Overview
The required services to build a static Website on AWS are S3 Buckets, Cloudfront, Certificate Manager, and Route53 (only if you manage your domain via AWS).
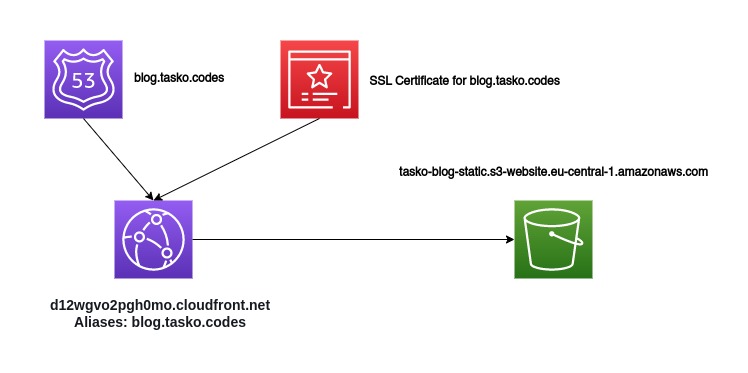
This is the infrastructure we use to host this blog you are reading right now. If you want to know how to set up your static page on AWS keep on reading 😁
Step 0 - Getting Started
We assume that you have a running Terraform setup on your machine and have an AWS Account and credentials that are sufficient to manage all required services. We use a pretty recent version of the AWS Provider from Hashicorp (>= 5.0).
Step 1 - Setup your S3 bucket
We require a S3 bucket to store your website data. Everything stored there will be accessible through the S3 Website Endpoint and later on through the Cloudfront distribution.
# file: bucket.tf

resource "aws_s3_bucket" "www_bucket" {
  bucket = "tasko-blog-static"
}
The most basic setup for a bucket is giving it a name, you can define many more options like versioning but we won’t require any of that.
To enable public access for everyone to the objects inside your bucket, we will have to create a bucket policy:
# file: bucket.tf

resource "aws_s3_bucket_policy" "allow_access_from_another_account" {
  bucket = aws_s3_bucket.www_bucket.id
  policy = data.aws_iam_policy_document.allow_public_access.json
}

data "aws_iam_policy_document" "allow_public_access" {
  statement {
    effect = "Allow"

    principals {
      type        = "*"
      identifiers = ["*"]
    }

    actions = [
      "s3:GetObject",
    ]

    resources = [
      "${aws_s3_bucket.www_bucket.arn}/*",
    ]
  }
}
This will create the following policy on your S3 Bucket:
{
    "Version": "2012-10-17",
    "Statement": [
        {
            "Effect": "Allow",
            "Principal": "*",
            "Action": "s3:GetObject",
            "Resource": "arn:aws:s3:::tasko-blog-static/*"
        }
    ]
}
Setup the Website Endpoint
If you have an extremely simple page, with only some documents stored directly in the bucket root you won’t have to do anything more. For most cases, it will be required to configure a Website Endpoint for the S3 Bucket. You then will be able to define some more options like an error document and default document for every folder inside your bucket.
# file: bucket.tf

resource "aws_s3_bucket_website_configuration" "www_bucket" {
  bucket = aws_s3_bucket.www_bucket.id

  index_document {
    suffix = "index.html"
  }

  error_document {
    key = "error.html"
  }
}
Using the Website configuration will allow you to create a static website with subdirectories containing additional index documents. You may have a file structure like this:
root/
├─ some-page/
│  \─ index.html
├─ other-page/
│  \─ index.html
\─ index.html
This would result in the following paths to access your pages http://example.org/, http://example.org/some-page/, http://example.org/other-page/
Setup a user to write objects
If you want to upload data to your S3 Bucket from outside of AWS you’ll need a IAM user with the current permissions. We can create this user in our Terraform configuration and return a set of Access & Secret Keys to use in our CLI or other AWS Client.
# file: user.tf

resource "aws_iam_user" "my_user" {
  name = "my-bucket-user"
  path = "/"
}

resource "aws_iam_access_key" "my_user" {
  user = aws_iam_user.my_user.name
}

output "user_name" {
  value = aws_iam_user.my_user.name
}

output "user_access_key" {
  value = aws_iam_access_key.my_user.id
}

output "user_secret_key" {
  value = aws_iam_access_key.my_user.secret
  sensitive = true
}
Creating the IAM user resource is not enough. We have to add a policy allowing access to the S3 Bucket created earlier.
# file: user.tf

data "aws_iam_policy_document" "allow_s3_upload" {
  statement {
    effect = "Allow"
    actions = [
      "s3:ListBucket",
    ]

    resources = [
      "${aws_s3_bucket.www_bucket.arn}",
    ]
  }
  statement {
    effect = "Allow"
    actions = [
      "s3:*Object",
    ]

    resources = [
      "${aws_s3_bucket.www_bucket.arn}/*",
    ]
  }
}

resource "aws_iam_user_policy" "s3_policy" {
  user = aws_iam_user.my_user.name
  policy = data.aws_iam_policy_document.allow_s3_upload.json
}
After applying the configuration you can run terraform output to obtain the user credentials.
Uploading your files
You can now upload all your static HTML files and other resource to your bucket. You could do that via the Web UI or the AWS CLI:
$ cd /path/to/you/static/files
$ aws s3 sync --delete . s3://your-bucket-name/
After setting up the Website configuration and uploading your files you could now use your static website. AWS creates a domain for every S3 bucket website following the schema http://BUCKET-NAME.s3-website.REGION.amazonaws.com/. That means our tasko-blog-static Bucket Website Domain would be http://tasko-blog-static.s3-website.eu-central-1.amazonaws.com/.
That’s not a very nice domain and it also nas no SSL support. So the next step is to set up AWS Cloudfront for SSL termination and support for custom domain names.
Step 2 - Cloudfront Distribution
We will now configure our Cloudfront Distribution. Cloudfront as as CDN is optimized for handling content of any kind. In our case - simple html/css/image files.
In our origin setup - the configuration that tells Cloudfront where it should fetch the data it is distributing. It’s very important to disable SSL usage -S3 website endpoints are HTTP only!
The default_cache_behavior block is used to configure what origin will be accessed and how the result is processed and sent to the Client. The viewer_protocol_policy = "redirect-to-https" forces all requests to redirect to HTTPS if they are unencrypted.
We could leverage Cloudfronts caching properties to prevent it from accessing our origin data too often. It can also set Cache Headers for client-side content caching - for now, we will ignore all of that.
Since we primarily send plain text data we enable compression.
# file: cloudfront.tf

resource "aws_cloudfront_distribution" "myapp" {
  enabled = true
  is_ipv6_enabled = true
  default_root_object = "index.html"

  origin {
    origin_id = "tasko-blog-default"
    domain_name = aws_s3_bucket_website_configuration.www_bucket.website_endpoint

    # using the s3 website endpoint requires us to setup a custom origin
    custom_origin_config {
      http_port = 80
      https_port = 443
      origin_protocol_policy = "http-only"
      origin_ssl_protocols = ["TLSv1", "TLSv1.1", "TLSv1.2"]
    }
  }

  default_cache_behavior {
    allowed_methods = ["GET", "HEAD"]
    cached_methods = ["GET", "HEAD"]
    target_origin_id = "tasko-blog-default"

    # don't forware query strings and cookies
    forwarded_values {
      query_string = false

      cookies {
        forward = "none"
      }
    }

    viewer_protocol_policy = "redirect-to-https"

    # configure this to enable content caching
    min_ttl = 0
    default_ttl = 0
    max_ttl = 0

    compress = true # set to false to disable compression
  }

  # dont restict access based on the client location
  restrictions {
    geo_restriction {
      restriction_type = "none"
    }
  }

  # let cloudfront generate a ssl certificate
  viewer_certificate {
    cloudfront_default_certificate = true
  }
}
Applying this configuration will result in a Cloudfront Distribution that fetches all data from our S3 website endpoint.
Every Cloudfront Distribution is reachable through a specific domain name. In our case that’s http://d12wgvo2pgh0mo.cloudfront.net/. Again our static website would be usable right now.
But we do some more customization to have Cloudfront respond to a custom domain.
Step 3 - Custom Domain
You probably want your website to be accessible at a custom domain. We will have to set up an alias in our Cloudfront Distribution and configure an SSL Certificate containing our custom domain name.
AWS Route53 is used to manage DNS Zones and DNS Records in AWS. Setting up the Zone and records aliasing the Cloudfront Distribution is very simple:
# file: domain.tf

resource "aws_route53_zone" "myzone" {
  name = var.domain_zone
}

# setup the records for the cloudfront distribution
resource "aws_route53_record" "myappv4" {
  zone_id = aws_route53_zone.myzone.zone_id
  name    = var.domain_name
  type    = "A"

  alias {
    name = aws_cloudfront_distribution.myapp.domain_name
    zone_id = aws_cloudfront_distribution.myapp.hosted_zone_id
    evaluate_target_health = false
  }
}

resource "aws_route53_record" "myappv6" {
  zone_id = aws_route53_zone.myzone.zone_id
  name    = var.domain_name
  type    = "AAAA"

  alias {
    name = aws_cloudfront_distribution.myapp.domain_name
    zone_id = aws_cloudfront_distribution.myapp.hosted_zone_id
    evaluate_target_health = false
  }
}
To enable SSL with your custom domain, we have to create a new SSL certificate and validation strategy. The AWS Certificate Manager will handle the certificate creation, validation and renewal by its own.
Since we want to use the certificate with Cloudfront, we have to create it in the global AWS region (us-east-1). If we create the certificate in a different region, it cannot be linked to Cloudfront.
To realize this, we create an alias for our AWS provider and set the region to “us-east-1”. We can then use this provider to create the certificate.
# file: main.tf

provider "aws" {
  alias = "global"
  region = "us-east-1"
  profile = var.aws_profile
}
# file: ssl.tf

resource "aws_acm_certificate" "mycert" {
  domain_name = var.domain_name

  validation_method = "DNS"

  lifecycle {
    create_before_destroy = true
  }

  provider = aws.global
}

resource "aws_acm_certificate_validation" "mycert-validation" {
  certificate_arn = aws_acm_certificate.mycert.arn
  validation_record_fqdns = aws_route53_record.cert_validation.*.fqdn
  provider = aws.global
}
To validate the domain for the SSL Certificate, AWS requires some special DNS records. We can create them easily by loading the information from the certificate resource.
# file: domain.tf

resource "aws_route53_record" "cert_validation" {
  name = tolist(aws_acm_certificate.mycert.domain_validation_options)[0].resource_record_name
  records = [ tolist(aws_acm_certificate.mycert.domain_validation_options)[0].resource_record_value ]
  type = tolist(aws_acm_certificate.mycert.domain_validation_options)[0].resource_record_type

  zone_id = aws_route53_zone.myzone.id
  allow_overwrite = true
  ttl = 60
}
Now we only have to bring our Domain, SSL Certificate, and the Cloudfront Distribution together. Therefore we have to modify our config and replace the viewer_certificate block.
# file: cloudfront.tf

resource "aws_cloudfront_distribution" "myapp" {
  ...

  # our custom domain name
  aliases = ["${var.domain_name}"]

  # reference our ssl certificate
  viewer_certificate {
    acm_certificate_arn = aws_acm_certificate.mycert.arn
    ssl_support_method = "sni-only"
    minimum_protocol_version = "TLSv1.1_2016"
  }

  depends_on = [aws_acm_certificate.mycert]
}
Now our website should be accessible via our custom domain name with enabled SSL.
Step 4 - Profit 🚀
You are done! You now have hosted your static website on AWS! Well, at least if you copied the configs and applied them to your account. You can find a GitHub repo with all config files at https://github.com/am4rth/terraform-example-static-website.